eForms

DTU eForms is DTU’s digital system for reimbursing expenses and paying fees to external parties, i.e. individuals who are not employed at DTU. Here you can find login access to the system and guidance on how to use eForms.

As a contact person, here’s what to be aware of before, during and after processing an eForms reimbursement.

For step-by-step instructions on how to use the system, see the eForms guide

Before creating an eForms reimbursement, make sure the following has been agreed with the external individual:

1. Does the external party have a CVR number?
If the external party operates a registered company (CVR number), an electronic invoice must be submitted instead of using eForms.

2. Agree on which expenses can be reimbursed
Only additional costs related to travel or stays for DTU can be reimbursed, such as transport, accommodation and meals.
Everyday personal expenses are not reimbursed, such as toiletries, alcohol and snacks.
Make sure you agree in advance on which expenses can be reimbursed.

3. Specify which category to select
In eForms, the external party must select their relationship to DTU (e.g. Special affiliation, Fee recipient or Other).
Make sure they know which category to select for the specific case. 

4. State contact person and purpose
Make sure the external party provides the name of the DTU contact person and a clear purpose for the expense or fee.

5. Agree on fees and required information
For fees or hourly payments, the following must be provided:

  • CPR number for individuals residing in Denmark
  • Date of birth, gender and TIN (Taxpayer Identification Number) for foreign recipients

Fees, hourly payments, allowances and mileage reimbursement are reported to the Danish Tax Agency.

6. Ask the external party to keep all receipts
All expenses must be documented with original receipts (invoice or receipt).
Order confirmations and credit card receipts cannot stand alone as documentation.
If multiple receipts in the same currency are combined into one line, attach a breakdown of the total (e.g. in an Excel file)

Once an eForms reimbursement has been submitted by the external party, it is received by the department in the Institute Inbox.
The contact person must review the reimbursement and ensure that it is correct before sending it for approval.

1. Find the reimbursement
All staff at the department can access the eForms reimbursement in the Institute Inbox.

The reimbursement can be opened via the blue links in the overview, and attached documents can be accessed via the paperclip icon.


2. Review the reimbursement

Make sure the reimbursement matches the agreement with the external party and that the purpose is clearly stated.

Pay particular attention to:

  • amounts matching the currency stated on the receipts
  • all expenses being supported by original documentation
  • order confirmations and credit card receipts not being the only documentation
  • proof of payment being included


3. Check contact person and approver
The contact person and approver must not be the same person.
The external party cannot be either the contact person or the approver.
The contact person and approver share responsibility for ensuring that the reimbursement is correct and in line with the agreement.


4. Check accounting details and information
Ensure correct account coding and check that the project and task are open.

Also make sure that:

  • the agreed rate is entered for hourly payments
  • notes are added where clarification is needed (e.g. if the external party has a DTU email address)


5. Correct errors or attach missing documentation
If there are errors in the reimbursement, it is the contact person’s responsibility to correct them and attach any missing documentation.

This is done in eForms by selecting “Edit form”.

If there are errors in the external party’s personal information (e.g. bank details or date of birth/TIN), the reimbursement can be returned to the external party.
The external party can only correct personal information – not add new expenses or attachments.
The external party receives a one-time login for eForms. The code can only be used once, but the login link does not expire. If a new login is needed, the contact person can resend it via “View all ongoing”, where the SUB number is located and the link under External is activated.


6. Send for approval or reject the case
Once the reimbursement has been reviewed and any corrections have been made, the contact person must send it for approval.

This is done by selecting “Confirm & forward” in eForms.

The contact person can only delete the reimbursement while it has the status Received.

If the case should be closed permanently, select “Reject – close case permanently”.

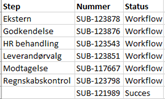
7. Track the status of the reimbursement
You can track the status in eForms under “View all”, where you can search by SUB number and see the current step and status.

If the reimbursement is rejected, the reason will appear in the log/notes – make sure to check these.

8. Get help from your superuser
If you have questions about the reimbursement, please contact your local superuser.

Once the reimbursement has been processed in eForms, it will have one of the following statuses:
Success (approved and sent for payment) or Cancelled (closed without payment).

Payment timelines

The payment depends on the type of reimbursement:

  • Expense reimbursements, allowances and mileage are paid by Accounts Payable twice a week
  • Fees for external parties without a Danish CPR number are paid by Accounts Payable twice a week
  • Fees for external parties with a Danish CPR number are paid via Payroll as part of DTU’s two monthly payroll runs

If an external party who has received a fee via Payroll is missing their payslip, a request must be submitted to HR via the Service Portal.

Log in to eForms to create and submit reimbursements for approval. In the system, select the relevant type of reimbursement (e.g. expenses or fees), then enter the required information and attach supporting documentation.

The system is available in both Danish and English.

Log in to eForms

Guides


Step-by-step guide to using eForms

This guide shows how to use eForms in practice – including selecting the type of reimbursement (e.g. expenses or fees), entering information, attaching documentation and submitting for approval.

Download the eForms user guide here


Delegate access in eForms

If a colleague needs to manage eForms on your behalf for a period, you can assign a delegate.
This guide explains how to grant a colleague access to act as your delegate during your absence.

Download the guide to assigning a delegate in eForms here

her

Need help with eForms?

If you have questions about using eForms, please contact your local superuser.

Superusers can help with completing reimbursements, documentation and use of the system.

Find your superuser here:

Updated 07 april 2026